A modern, open source C++ dev environment with Visual Studio Code, vcpkg, and CMake
When I start to use a programming language I always have the following questions:
- How do I build/run my program?
- How do I run tests?
- How do I install dependencies?
- How do I integrate all of this in my text editor?
Some languages such as Go come with simple answers to these questions: go build ./..., go test ./..., go get <my module>, install the official Go extension for your editor. Done. But of course in the case of C++, things are ... different 🙃.
The C++ world is way more fragmented, there is a lot of choices of build and meta build tools, various test frameworks (each with its own test runner), lot of way to manage dependencies, etc. Because so much choices can be daunting for people who just want to start with the language, and because I know I will forget how things work, in this article I will document what I've done to get to a fully working environment that answers all my questions in a simple and coherent way. At the end of this guide we will be able to build and run tests in just one click (or command line if that's your thing).
Tools popularity can vary quite a lot from years to years, for example solutions to manage dependencies are still competing against each other and new ones are popping all the time, so I want to be clear that this document is my setup in 2020, hopefully it will stay evergreen in the future, but I wouldn't bet too much on it.
What we will do:
- Setup and use
vcpkgto download, build, and install open source dependencies such as catch2 (for our tests), and fmt (for our code). - Use CMake to manage our builds and run our tests.
- Configure Visual Studio Code so that we can control our builds and tests directly from the editor, and have autocompletion for dependencies installed via
vcpkg.
Note: I'm currently using Windows 10 as my main operating system, everything I document here has also been tested on Linux via WSL, and should work as well on macOS. You should be able to follow without facing OS specific issues, but we never know. Don't hesitate to contact me if you find issues so that I can update this guide.
Requirements
To follow this guide you will need a C++ compiler suite and git.
If you are in a UNIX environment that will likely be gcc or clang, they can be installed from the package manager of your system.
If you are running Windows you can install Microsoft's compiler. For this you need to install either Visual Studio (not Visual Studio Code), or if you do not want to install a full IDE you can decide to install only the build tools (select "Build Tools for Visual Studio 2019").
Another option that isn't always well known for Windows: Windows 10 has a feature named "WSL" that makes it possible to run a Linux subsystem. That makes it simple to install gcc or clang and work on cross-platform application without the need to switch to a different operating system. It's a fantastic feature, I won't cover it here but it's worth knowing that exists. Checkout Microsoft's documentation if you're curious about it. Both Visual Studio and Visual Studio Code have support for WSL.
vcpkg, Microsoft's solution to C++ library management
vcpkg is one of the latest addition to the list of existing solutions to manage C++ dependencies. It's use is quite easy and should feel familiar to people who used package managers such as NPM. Though, two things surprised me when I first tried to use it:
- You don't install it in a conventional way, instead of downloading a command line tool that you add to our PATH then run it from your project directory, what you have to do is
git clonethevcpkgrepository from GitHub, then build the command line tool via a bootstrap script, and use the resultingvcpkgbinary it from there. - Packages are installed directly in the directory of the cloned repository, meaning that anything installed are somehow global, but you can also clone the repository multiple time in different directories if that's an issue.
Let's see how to set it up.
First be sure to be in the directory where you want the command tool to be located (the vcpkg team recommands C:\src\vcpkg or C:\dev\vcpkg, which is a bit weird in my opinion, I personally clone it in my C:\Users\Sam\Development directory. Just pick something that is good for you). Then clone the repository:
> git clone https://github.com/microsoft/vcpkg
> cd vcpkg

# If you are on Windows, run the batch file
> bootstrap-vcpkg.bat

# If you are on a UNIX system, run the shell script
> boostrap-vcpkg.sh
And... that's it. The tool is now compiling, after some time you will get a vcpkg binary (vcpkg.exe on Windows).
Now let's install two open sourced libraries, Catch2 and fmt.
First we can see what is available for catch to have an idea of the version and dependency name we should use:
> vcpkg search catch
catch                alias            Deprecated alias for Catch2 unit testing framework
catch-classic        1.12.2           A modern, header-only test framework for unit tests
catch2               2.12.1           A modern, header-only test framework for unit testing.
As we can see catch is referencing a previous version of the library that is now deprecated, and we should use the name catch2 if we want to get the latest version.
Important note: by default
vcpkgwill install thex86version of the library, which is likely to cause issues if you're building for anx64target. It's better to always specify explicitely the "triplet", in my case that'scatch2:x64-windows. If at some point CMake tells you that an installed library cannot be found, be sure to check that you installed it for the correct architecture and platform! I lost quite a lot of time debugging my setup before I realized that. I would personally prefer that it forces me to always specify the triplet to avoid that kind of mistake.
> vcpkg install catch2:x64-windows
Computing installation plan...
The following packages will be built and installed:
    catch2[core]:x64-windows
Detecting compiler hash for triplet x64-windows...
... # way more logs when vcpkg downloads then compiles the library
Installing package catch2[core]:x64-windows...
Installing package catch2[core]:x64-windows... done
Elapsed time for package catch2:x64-windows: 964.9 ms

Total elapsed time: 6.311 s

The package catch2:x64-windows provides CMake targets:

    find_package(Catch2 CONFIG REQUIRED)
    target_link_libraries(main PRIVATE Catch2::Catch2)


# We can also install fmt while we are at it
> vcpkg install fmt:x64-windows
Computing installation plan...
The following packages will be built and installed:
    fmt[core]:x64-windows
Detecting compiler hash for triplet x64-windows...
... # again, more logs here
Building package fmt[core]:x64-windows... done
Installing package fmt[core]:x64-windows...
Installing package fmt[core]:x64-windows... done
Elapsed time for package fmt:x64-windows: 18.25 s

Total elapsed time: 21.78 s

The package fmt provides CMake targets:

    find_package(fmt CONFIG REQUIRED)
    target_link_libraries(main PRIVATE fmt::fmt)

    # Or use the header-only version
    target_link_libraries(main PRIVATE fmt::fmt-header-only)
vcpkg is really helpful here as it directly tells us what we need to use the library from CMake, which is exactly what we will do. If at any point you want to see again the CMake targets, just run the install command again for the same library tripplet.
Note: one important detail. In the case of
fmt, vcpkg outputs links bothfmt::fmtandfmt::fmt-header-only, but we should really only use one or the other, and not both. I didn't see this issue for other libraries.
And that's it, our two dependencies are now installed. If you're curious you can check the installed directory located in the vcpkg clone directory, that's where libraries source code and headers are located.
CMake, the meta-build system
CMake is its own beast. I won't go too far into its details because that can feel overwhelming quite fast. So let's defines what we want to use it for:
- Define a
maintarget, that will be our main binary. It should link against our project source code and thefmtlibrary. - Define a
run_teststarget, that will be our test runner. It should link against our project and test source code, and thecatch2library. - Once that's done we should be able to build our targets and run our tests in just one command.
The first thing is of course to install cmake. Just download the installer from the website or install from your platform package manager. Once done you should have a cmake command line tool available from your terminal.
Then move to your project directory, which I assume looks something like this:
> cd HelloWorld
> tree /F
C:.
├───include
│   └───helloworld
│           hello.hpp # define a hello::greeting() function
│
├───src
│       main.cpp # - implement a simple main() that calls hello::greeting()
|                # - include <fmt/core.hpp>
|                # - include "helloworld/hello.hpp"
|        hello.cpp # - implement hello::greeting()
|                # - include "helloworld/hello.hpp"
│
└───tests
        tests.cpp # - implement simple Catch2 tests for hello::greeting()
                  # - define CATCH_CONFIG_MAIN
                  # - include <catch2/catch.hpp>
                  # - include "helloworld/hello.hpp"
We need to add a file CMakeLists.txt to our project directory, with the following content:
# CMakeLists.txt

cmake_minimum_required(VERSION 3.16)
project(HelloWorld DESCRIPTION "A hello world project" VERSION 0.0.1)

# ———————————————————————————
# find 3rd party dependencies
# ———————————————————————————

find_package(fmt CONFIG REQUIRED)
find_package(Catch2 CONFIG REQUIRED)

# —————————————————————————
# create target for library
# —————————————————————————
add_library(hellolib src/hello.cpp)
target_compile_features(hellolib PUBLIC cxx_std_17)
target_link_libraries(hellolib PRIVATE fmt::fmt)

target_include_directories(hellolib
	PUBLIC
		$<INSTALL_INTERFACE:include>
		$<BUILD_INTERFACE:${CMAKE_CURRENT_SOURCE_DIR}/include>
	PRIVATE
		${CMAKE_CURRENT_SOURCE_DIR}/src
)

# —————————————————————————————
# create target for main binary
# —————————————————————————————
add_executable(main src/main.cpp)
target_compile_features(main PUBLIC cxx_std_17)
target_link_libraries(main PRIVATE hellolib fmt::fmt)

# —————————————————————————————————————————
# create target for test, enable testing, and register a test "RunAllTests"
# —————————————————————————————————————————
add_executable(run_tests tests/tests.cpp)
target_compile_features(run_tests PUBLIC cxx_std_17)
target_link_libraries(run_tests PRIVATE hellolib Catch2::Catch2)

enable_testing()
add_test(RunAllTests run_tests)
As you can see the find_package and target_link_libraries are based on vcpkg's output that we got after installing fmt and catch2.
Note: CMake is an incredibly flexible system that can be used to adjust build settings to almost any requirements. But that flexibility comes with a cost in complexity. What I want to do in this guide is to present the minimum required to get started with your project, you can then tweak your build configuration to match your specific needs. The secret to not be overwhelmed is to start with something simple, that works, then gradually add more features when needed.
If you want to dive deeper into CMake I recommend to check out CGold: The Hitchhiker's Guide to the CMake.
We can now run CMake from the command line to configure then build our targets. The first time will take a bit of time as CMake has to detect some properties such as which compiler to use. Though everything will be cached next time you call cmake it should be fast.
> cmake -B build -S . -DCMAKE_TOOLCHAIN_FILE=C:/Users/Sam/Development/vcpkg/scripts/buildsystems/vcpkg.cmake
-- Building for: Visual Studio 16 2019
-- Selecting Windows SDK version 10.0.18362.0 to target Windows 10.0.20221.
-- The C compiler identification is MSVC 19.27.29111.0
-- The CXX compiler identification is MSVC 19.27.29111.0
-- Detecting C compiler ABI info
-- Detecting C compiler ABI info - done
-- Check for working C compiler: C:/Program Files (x86)/Microsoft Visual Studio/2019/Community/VC/Tools/MSVC/14.27.29110/bin/Hostx64/x64/cl.exe - skipped
-- Detecting C compile features
-- Detecting C compile features - done
-- Detecting CXX compiler ABI info
-- Detecting CXX compiler ABI info - done
-- Check for working CXX compiler: C:/Program Files (x86)/Microsoft Visual Studio/2019/Community/VC/Tools/MSVC/14.27.29110/bin/Hostx64/x64/cl.exe - skipped
-- Detecting CXX compile features
-- Detecting CXX compile features - done
-- Configuring done
-- Generating done
-- Build files have been written to: C:/Users/Sam/Development/temp/CMakeHelloWorld/build
Important notes here:
-B buildspecifies that we want to use./buildas the CMake build directory-S .specify the path to our sources-DCMAKE_TOOLCHAIN_FILE=C:/Users/Sam/Development/vcpkg/scripts/buildsystems/vcpkg.cmakeis the magic to make CMake aware of vcpkg installed libraries. The path should match the location where you installedvcpkg.
If everything went well, that's great, you are basically done.
If you got errors Could not find a package configuration file provided by <library name> with any of the following names: [...], be sure to check
- that you installed the library with the correct triplets. That has been one of my main source of frustration.
- that the path you provided to
-DCMAKE_TOOLCHAIN_FILE=is targeting thevcpkgroot where you installed the library - that you didn't mispell the name of the library in
CMakeLists.txt - that you're using the CMake statement as mentioned by
vcpkgwhen you runvcpkg install <library name and triplet>. The output varies from library to library, so be sure to triple check this one (for example sqlite3 requiresfind_package(unofficial-sqlite3 CONFIG REQUIRED)) - delete the
builddirectory and try again
Ok, let's assume the configure step went well, we can now build our targets. Your output will of course vary if you use a different compiler than I do.
> cmake --build build
Copyright (C) Microsoft Corporation. All rights reserved.

  Checking Build System
  Building Custom Rule C:/Users/Sam/Development/temp/CMakeHelloWorld/CMakeLists.txt
  hello.cpp
  hellolib.vcxproj -> C:\Users\Sam\Development\temp\CMakeHelloWorld\build\Debug\hellolib.lib
  Building Custom Rule C:/Users/Sam/Development/temp/CMakeHelloWorld/CMakeLists.txt
  main.cpp
  main.vcxproj -> C:\Users\Sam\Development\temp\CMakeHelloWorld\build\Debug\main.exe
  Building Custom Rule C:/Users/Sam/Development/temp/CMakeHelloWorld/CMakeLists.txt
  tests.cpp
  run_tests.vcxproj -> C:\Users\Sam\Development\temp\CMakeHelloWorld\build\Debug\run_tests.exe
  Building Custom Rule C:/Users/Sam/Development/temp/CMakeHelloWorld/CMakeLists.txt

# We can try our main binary
> ./build/Debug/main.exe
Hello world. # comes from main()
The answer is 42. # comes from hello::greeting()

# And our test runner
> ./build/Debug/run_tests.exe

~~~~~~~~~~~~~~~~~~~~~~~~~~~~~~~~~~~~~~~~~~~~~~~~~~~~~~~~~~~~~~~~~~~~~~~~~~~~~~~
run_tests.exe is a Catch v2.12.1 host application.
Run with -? for options

-------------------------------------------------------------------------------
Greeting should return a silly answer
-------------------------------------------------------------------------------
C:\Users\Sam\Development\temp\CMakeHelloWorld\tests\tests.cpp(5)
...............................................................................

C:\Users\Sam\Development\temp\CMakeHelloWorld\tests\tests.cpp(8): FAILED:
  REQUIRE( hello::greeting() == "The answer is 99." )
with expansion:
  "The answer is 42." == "The answer is 99."

===============================================================================
test cases: 1 | 1 failed
assertions: 2 | 1 passed | 1 failed
Run your tests via ctest
CMake also comes with CTest, a tool that can be used to run tests in a more generic way. It has to be run from within CMake build directory.
> cd build
> ctest --output-on-failure
Test project C:/Users/Sam/Development/temp/CMakeHelloWorld/build
    Start 1: RunAllTests
1/1 Test #1: RunAllTests ......................***Failed    0.03 sec

~~~~~~~~~~~~~~~~~~~~~~~~~~~~~~~~~~~~~~~~~~~~~~~~~~~~~~~~~~~~~~~~~~~~~~~~~~~~~~~
run_tests.exe is a Catch v2.12.1 host application.
Run with -? for options

-------------------------------------------------------------------------------
Greeting should return a silly answer
-------------------------------------------------------------------------------
C:\Users\Sam\Development\temp\CMakeHelloWorld\tests\tests.cpp(5)
...............................................................................

C:\Users\Sam\Development\temp\CMakeHelloWorld\tests\tests.cpp(8): FAILED:
  REQUIRE( hello::greets() == "The answer is 99." )
with expansion:
  "The answer is 42." == "The answer is 99."

===============================================================================
test cases: 1 | 1 failed
assertions: 2 | 1 passed | 1 failed


0% tests passed, 1 tests failed out of 1

Total Test time (real) =   0.04 sec

The following tests FAILED:
          1 - RunAllTests (Failed)
Errors while running CTest
Setup Visual Studio Code for an IDE experience
I'm assuming that you already have Visual Studio Code installed and that you are already familiam with it, I will only talk about the steps required to integratem CMake and vcpkg.
We need 4 extensions:
- C/C++ for Visual Studio Code from Microsoft. Syntax highlighting and intellisense for C++.
- CMake by twxs. Syntax highlighting and intellisense for CMake.
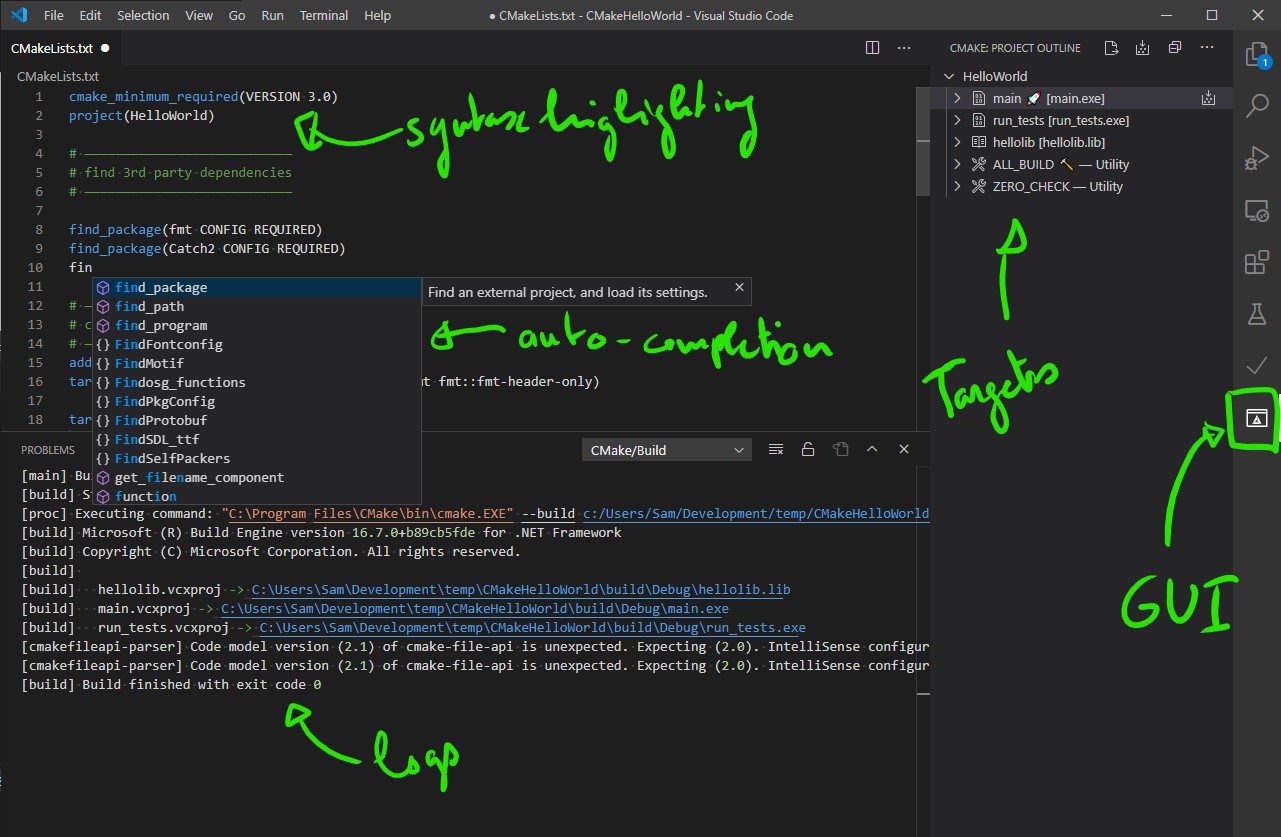
- CMake Tools also from Microsoft. When installed and enabled you get the ability to configure, build, and run CMake targets. It also comes with a nice graphical interface integrated in VSCode.
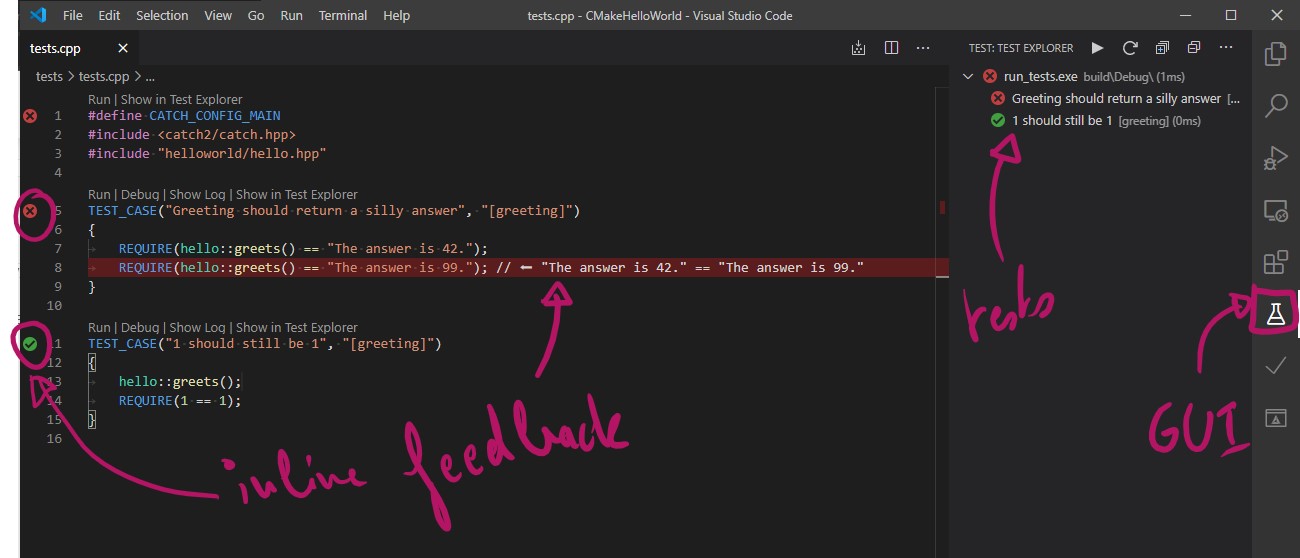
- C++ TestMate by Mate Pek. Gives us support for tests directly in VSCode, also with a great graphical interface integration.
Install them directly from VSCode. I recommend to only enable "C++ TestMate" and "CMake Tools" for your current workspace as they only make sense in some specific C++ projects and can get in your way if a project is detected as CMake based when that's not the case (I had that situation when working on Arduino projects). Just enable them for the workspace every time you start a new CMake project.
By default they should already work correctly and if you followed the rest of this guide you should now have something like this:
We will only need to do a few tweaks to make them work well with vcpkg. For this add a .vscode/settings.json file in your project:
// .vscode/settings.json
{
	"cmake.configureOnOpen": true,
	"cmake.configureSettings": {
        // Replace the path with the correct location to your own vcpkg root
		"CMAKE_TOOLCHAIN_FILE": "C:/Users/Sam/Development/vcpkg/scripts/buildsystems/vcpkg.cmake",
	}
}
And specify "CMake Tools" as the autocompletion provider in your C++ settings in .vscode/c_cpp_properties.json:
// .vscode/c_cpp_properties.json
{
    "configurations": [
        {
            // [...]

            // Here we specify which extension to use for the autocompletion
            // 👇
            "configurationProvider": "ms-vscode.cmake-tools"
        }
    ],
    "version": 4
}
Conclusion
And we are finally done! We can now manage our dependencies via vcpkg, define our builds from our CMake file, and configure, build, and run all our targets and tests from Visual Studio Code for a fancy development experience. And all of this by only using Open Source projects :)
vcpkg is a Godsend, that makes dealing with dependencies and CMake SO MUCH BETTER than anything else I tried before! No more ugly CMake scripts to download a test framework and runner and some simple dependencies! It's fantastic to see recent developments from folks at Microsoft, the amount of time and energy spent on improving the C++ dev experience via open source contributions is admirable.
It took me quite some time to get something I'm satisfied with, I spent a few hours fighting with CMake and vcpkg, reading their documentation, testing VSCode settings and plugins, etc. Hopefully that can help others who are looking for some guidance! ✌